|
Observing Tool Tutorial |
This tutorial is intended for new users of the Observing Tool (OT) who need to prepare their Phase II observation details.
The illustrated tutorial leads you step-by-step through the process starting with the Phase II "skeletons" distributed by Gemini Observatory, through defining telescope, guide star and instrument configurations and sequences, to submitting your completed Science Program. Other web pages in the OT section provide a reference guide for more advanced users.
![]() Starting
with the 2007B OT the OT attempts to help you with this process by
checking the Phase II for you, pointing out problems, and making
suggestions for fixing them. Click here for more information about how this feature works.
Starting
with the 2007B OT the OT attempts to help you with this process by
checking the Phase II for you, pointing out problems, and making
suggestions for fixing them. Click here for more information about how this feature works.
If you can't find the information you are looking for, try the Gemini web search engine. If that fails, submit a query to the HelpDesk where it will be dealt with promptly. There is a special HelpDesk interface to ask questions about a specific Phase II program using your Gemini Program ID. All of these options are available from the search and HelpDesk page.
Conventions and icons used in this tutorial are as follows:
| normal font | Description of the steps in the process |
| bold font | Emphasized text |
| italic font | Menu item, button or other interactive feature of the user interface |
| BOLD CAPITALS | Key terminology. The term is defined in a highlighted box near when it is first used. |
| Useful tip | |
| Important or cautionary note | |
| Asides and links to detailed information on other OT web pages | |
 |
Thumbnail image illustrating a particular step in the process. When available (image is surrounded by a blue box), click on the image to see a larger version. |
This tutorial was written for public 2002B OT (Limberlost) and has been updated for the 2008B OT.
| Step 0 - Before you start | (jump ahead to next step) |
If you have not already done so, download and install the current version of the Observing Tool.
There are supported versions of the OT available for Windows, Solaris, Linux, and Mac OS X operating systems. If using the Solaris version, please ensure that you have the necessary patches to run Java 1.5 on your workstation. If you run the OT under other operating systems, please let us know.
| See the OT installation page for installation instructions, links to the OT software on the ftp site and Solaris patches. |
There are special instructions for the current semester which highlight any late-breaking news and give the deadlines for return of your completed Phase II Science Programs.
| Review the special instructions for this semester. If you are familiar with previous versions of the Observing Tool, the release notes summarise the changes from the previous public version. |
| Step 1 - Fetch the Phase II Skeleton and OT Libraries | (jump ahead to next step) |
Gemini Observatory staff generate a skeleton SCIENCE PROGRAM with information extracted from your approved Phase I proposal. Each successful Principal Investigator will be sent instructions on how to retrieve it from the Gemini site.
| Science program: a Science Program contains all of the information associated with one approved proposal. This includes the Phase I proposal itself and is developed during Phase II to include detailed definitions of the observations including telescope and instrument configurations and sequences, observing condition constraints, acquisition instructions, guide stars and calibrations. (In the future it will also include definition of the data processing sequence and links to the data). |
PIs download and upload their Science Programs from a database at the Gemini site. Remote access to the database is via the fetch item available from the welcome screen and the desktop and Science Program Editor file...fetch menus.
| See more information about the Gemini observing database. |
To retrieve a skeleton Science Program select fetch and the appropriate database (Gemini North or South) and enter the unique numeric key sent to you in your Gemini PI notification email and your Gemini Program ID number (in the example format GN-2003B-Q-56).
| You can export your Science Program as an XML file at any time. This is a convenient format for exchanging the working version with collaborators or for making backup copies. When you re-import the XML file, the OT recognises that a Science Program with the same name exists in your local database and prompts you whether to replace the previous version when the new one is loaded. See the OT saving and loading page for further information. |
| You do not need to fetch from the Gemini Observing Database or import an XML file each time you run the OT. The Observing Tool maintains a database on your local disk in which it stores the current versions of your Science Programs as you work on them. However, once you have stored observations with status For Review then it is a good practice to fetch your program before making any changes. |
This is also a good opportunity to fetch the OT libraries for the instruments that you are going to use. The libraries are sets of example observations, common configurations, and some standard stars. Many people find it easy to create their Phase II by pasting the templates from the libraries into their progams and then updating the targets, observing conditions, and sequence details.
| Step 2 - Review the Skeleton Science Program and Observation Info | (jump ahead to next step) |
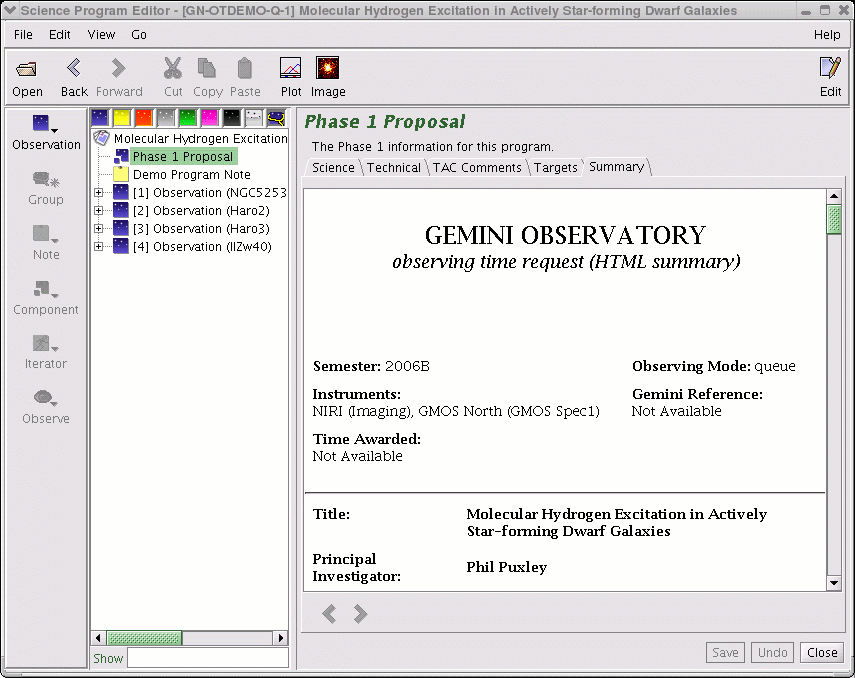
Having fetched the skeleton science program, it will be opened in a SCIENCE PROGRAM EDITOR window. (You can open a science program already in your local database using the Open... or Open in New Window... items from the file menu. You can open multiple science programs at the same time).
| Science program editor: The science program editor is the main graphical user interface used to display and modify all of the details of your observations. |
| The editor consists of a science program viewer on the left-hand side, which shows the observations and their constituent components in a hierarchical structure, detailed editors for each observation component on the right-hand side, and several toolbars. |
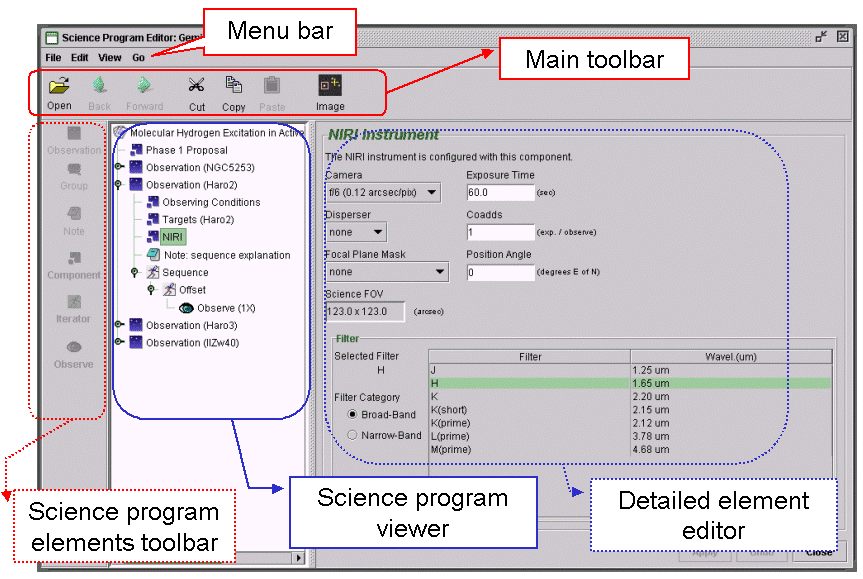 |
If text in the component editor overlaps other text or is overly compressed, click-and-drag the lower right corner of the science program editor to resize it. You can also move the separator between the left and right-hand panels.
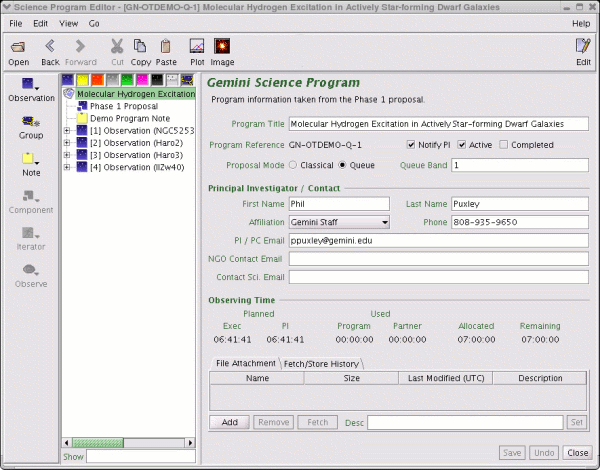
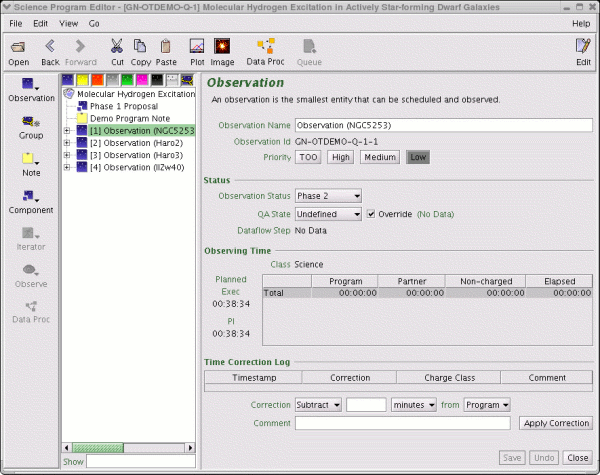
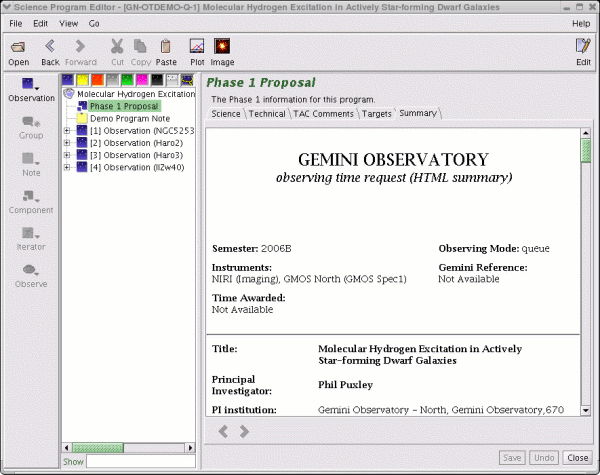
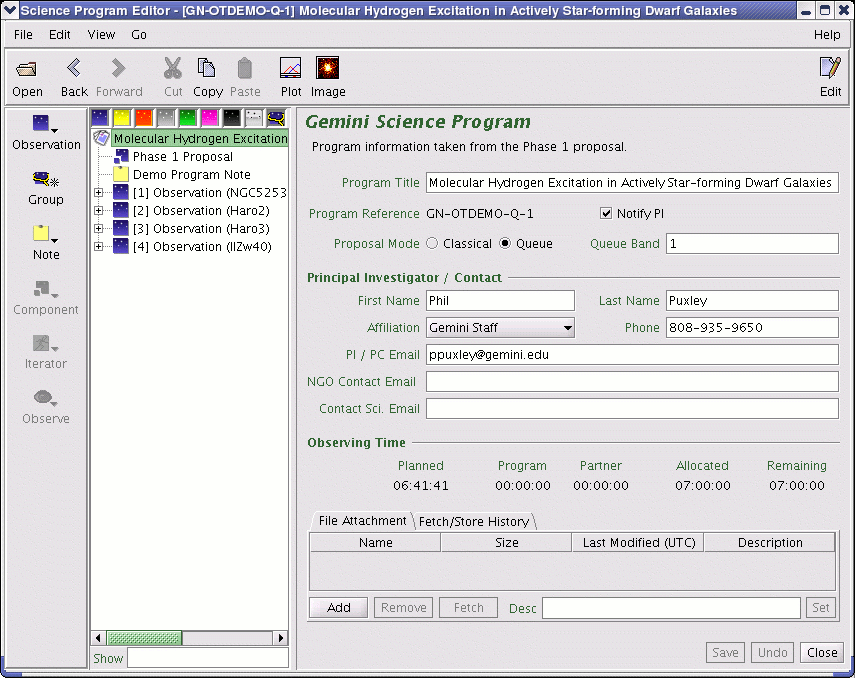
| Select the program title at the top of the science program tree to display top-level information such as PI contact details, the program title, Gemini reference information (e.g. program reference ID, NGO contact, Contact Scientist, queue band and program status), and the total allocated, planned, charged, and remaining times. The allocated times are also shown on the queue or classical summary web page. At the bottom of the screen are tabs giving the fetch/store history of the program and a facility for storing and fetching attachments like finding charts and mask design files (see below). Some of this information, such as the PI contact info, can be changed. (We will learn about editing the science program in the below). |
 Click image for larger view Click image for larger view |
Expand (or contract) the hierarchical tree structure for an OBSERVATION
by clicking on
the relevant expansion icon  . As the observation is
normally the smallest schedulable element, each new science target must be defined as a separate
observation. Likewise, each observation in the observing sequence star-object-star-object... must be a separate
observation. (We will return to calibration stars in step 13). There may be many
observations within one science program.
. As the observation is
normally the smallest schedulable element, each new science target must be defined as a separate
observation. Likewise, each observation in the observing sequence star-object-star-object... must be a separate
observation. (We will return to calibration stars in step 13). There may be many
observations within one science program.
| Observation: All the information needed to observe one target with a given instrument and set of constraints. Normally the scheduling element that corresponds to one telescope 'pointing'. Observations are self-contained and must include all necessary telescope, instrument and sequence information. |
An observation is self-contained and must possess:
The observations in your skeleton science program will typically contain a subset of the mandatory details extracted from your Phase I proposal. Normally this will be the observing conditions, the target position and any guide stars. In general, instrument details defined in Phase I will not appear in the skeleton observations as it is difficult in many cases to identify automatically which of the multiple configurations (filters, gratings, wavelengths etc) are to be associated with specific observations. (It is hoped to include a first approximation to the instrument configuration in the skeleton science program in a future release).
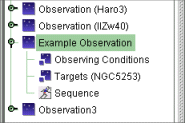
| To familiarize yourself with the layout and information content, select the observation, observing condition, target, (named) instrument and sequence components in turn by clicking on the name or icon of each in the science program editor. The right-hand panel of the editor will show the detailed information. Note how elements in the science program editor toolbar become active or are greyed out as you select different components in the observation. This is because an observation may have only one of each type of component (to avoid confusion by, say, defining the telescope position twice). | 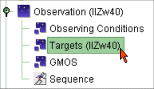 |
Will we learn how to modify the observation details in the next few steps of this tutorial. The skeleton observation also includes an (empty, for now) sequence folder.
| See more information on the individual science program elements and components. |
| Step 3 - Setting the
Observation Priority (and saving/undoing any changes) |
(jump ahead to next step) |
| Select the top-most level of an observation. By default, in the skeleton science program these are labelled Observation (target_name) where target_name is the name of the target extracted from the Phase I proposal. |
 |
| When you first open a science program it may be opened in read-only mode. In this case, all of the components details are shown in light grey (or blue). You can toggle between read-only and edit modes using the button in the top-right corner of the science program editor. |
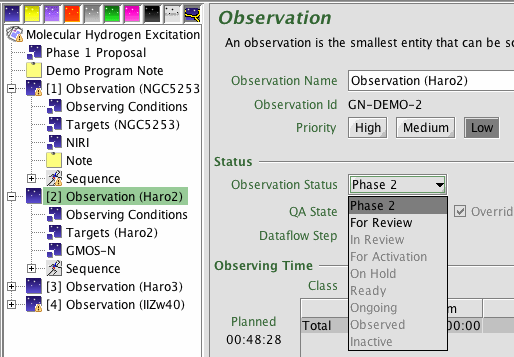
The observation component editor shows top-level information such as the name of the observation, the execution status of the observation and data (for use by Gemini staff) and observation priority. The ordering of the observations in the science program does not convey any prioritisation or preferred sequence. To indicate to the Gemini staff executing the queue the relative importance of observations within a program, you can use the low / medium / high priority buttons.
| Observations can be combined in groups to define a sequence order. This is illustrated in step 12; see also the discussion on ordering and execution priority for more information. |
Every component editor has Save and Close buttons in the lower right. When you open the observation component for the first time, note that the Save button is greyed out. As an experiment, change the observation priority from its default Low state to High or Medium. The Save button is now active. Clicking Save will save this change to the local database.
|
|
Unsaved changes are automatically saved whenever you select any other component or observation. (This takes some getting used to and is necessary because of the tight interaction between the Position Editor visualisation tool and observation definition in the science program editor). You can undo the auto-saved changes in the same way as if you had manually saved them. When you open a science program in the OT, the program chooser menu shows the date when the program was last modified (i.e. manually or auto-saved). |
The Close button saves any changes and closes the science program.
| Step 4 - Modifying
the Observing Condition Constraints (and the change request process) |
(jump ahead to next step) |
| Select the OBSERVING CONDITIONS COMPONENT for an observation. | 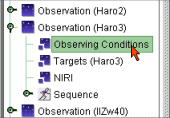 |
The relevance of the four conditions (sky background, image quality, cloud cover and water vapor) depends on the wavelength and particular science of your observation. For example, the water vapor content is normally irrelevant for optical imaging or spectroscopy.
Each observing condition is defined by its frequency of occurrence. Thus the best image quality is the 20%-ile bin, and so forth. The meaning of the observing condition bins depends on wavelength. For example, the 20%-, 50%- and 80%-ile near-IR (1-2.5um) sky brightness all have the same value (in magnitudes), whereas they have very different values at optical wavelengths.
| Observing Conditions Component: The Observing Conditions component defines the poorest conditions under which the observation can be executed. |
|
|
Remember, that if your constraints are very tight, then the chances of your observation being executed are correspondingly small. The four conditions are, to zeroth order, independent at most wavelengths and so the combined frequency of occurrence can be estimated simply by multiplying them e.g. less than 0.2% if you have a 20%-ile constraint for each condition. |
| See the detailed observing condition constraints for the translation between %-ile bins and specific conditions as a function of wavelength. |
| The change request process is explained in more detail and examples of major and minor changes are given. |
| Step 5 - View and
Change Target (Base) Position (and cutting, copying, pasting) |
(jump ahead to next step) |
Select an observation (any component will do). The image button on the science program editor toolbar opens the POSITION EDITOR window.
| Position editor: The position editor provides a graphical view of the observation and can interactively modify elements of it. |
The position editor enables an image of the field around the target to be overlayed with available guide stars, wavefront sensor patrol field and vignetting, the instrument imaging or spectroscopic field of view, observation sequence information showing dither, chop, nod and mosaic patterns and much, much more.
| The position editor has many features, only some of which we will examine in this tutorial. See the position editor web pages for more detailed capabilities. |
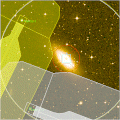
| When the position editor is opened for a new observation, there is no
underlying image and the target base position is shown as a yellow earth symbol
on a black background |
 |
| In fact, any FITS image can be used as the background to the position editor. If the image has world co-ordinate system information in the correct format (as do all of the image servers listed) then the [RA, dec] of the cursor position is shown in the lower right as you move the cursor across the field. |
To adjust the base pointing position, change the position editor mode from browse to drag on the toolbar and click-and-drag the base position symbol. If at the same time you have the telescope targets component open in the science program editor, you will see the [RA, dec] values change. Likewise, if you edit the [RA, dec] values directly in the top panel of the targets component, the base location in the position editor will change.
If you make a large change, you will need to download a new image centered on the new base position. Remember, if you make a major change you will need to follow the change request process described in step 4.
|
|
Although there is tight interaction between the position and science program editors, it is possible to get them confused (e.g. with the undo/redo button). If the position editor does not reflect the current configuration, select a different observation in the science program editor and then re-select the original one. This will usually force the position editor to refresh the display. |
| You do not need to download background images each time you use the OT. Images are stored locally on disk and maintained in a cache of 20 images. The image in the cache whose center is close to the base position is displayed, if it is found. If you move the base position more than a certain amount, the image in the cache will not be used anymore. See an overview of the position editor viewer for more details. |
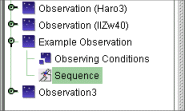
If your science program contains several observations of the same target, you can make the same position adjustment to the others by cutting, copying and pasting the changed target component. As noted in step 2, each observation may have only one target component and so you must first remove the unwanted targets. Simply select a target component and click cut in the main toolbar. Then select the modified target component, click copy, select the new observation and click paste. This procedure is illustrated below:
| Action | Example | ||
| (a) Select unwanted target component | 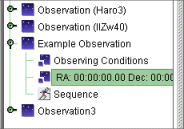 |
||
| (b) Click Cut |  |
 |
|
| (c) Select modified target component | 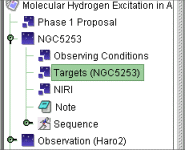 |
||
| (d) Click Copy | 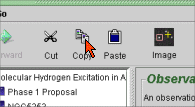 |
||
| (e) Select new observation(s) (note that the new target can only be created when the observation level is highlighted). More than one observation can be selected by Shift or Ctrl clicking. | 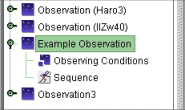 |
||
| (f) Click Paste. The buffer contents will be pasted into all selected observations. | 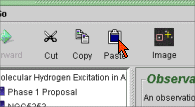 |
 |
|
| The cut, copy and paste features are also available using the right-hand mouse button for components in the science program editor. |
| Step 6 - Add Target Acquisition Details (or other notes) | (jump ahead to next step) |
The accuracy with which the position editor and a background image defines the base telescope position depends on the precision of the target co-ordinates (e.g. if entering [RA, dec] explicitly) or the world co-ordinate system of the image (if using the position editor). For many imaging observations this will suffice.
For many spectroscopic programs the target may be too faint to detect in an acquisition image of reasonable exposure time (~60 seconds). In this case the coordinates of a brighter reference star should be given in a User target. The reference star will be acquired into the center of the slit and then the telescope will be offset to the Base (science) position. The relative positions of the User and Base (science) targets should be accurately known. More details are available for how to set up such "blind acquisitions". You can add also one or more notes to an observation to describe in words the target acquisition that you wish the Gemini staff to perform. Notes may be used to convey other information such as the reason for a particular calibration sequence or a non-standard offset pattern.
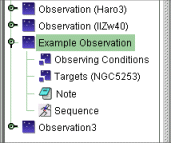
To add a note, select an observation in the science program editor and click on the Note button in the science program elements toolbar. (As with the telescope component in step 5, you can only add a note at the observation level although you can add multiple notes). This procedure is illustrated below:
| Action | Example | ||
| (a) Select an observation | 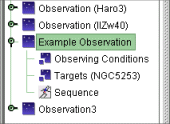 |
||
| (b) Click Note button |  |
 |
|
As with all component editors, you can change the title to make it more meaningful (the title is the text shown in the science program editor). The just type your text in the note field.
| For GMOS multi-slit observations, the slit positions are defined using a GMOS image and separate mask-definition software. (See details of the GMOS mask definition process). You must define the imaging observation as part of your science program. |
|
|
Any target acquisition information should be included in a note, rather than being e-mailed to your Contact Scientist (CS) because (a) the information is then associated with that observation in the database and (b) your CS will often not be the observer at the time of execution. If target field is crowded or the target is too faint to see clearly on a Digital Sky Survey or 2MASS image, then a finding chart should be submitted using the File Attachment tab on the top level program information screen in the Program Editor. One way to create a finding chart is to use the image display, instrument overlay and annotation tools available in the position editor and then perform a screen capture. |
| Step 7 - Define the Instrument Configuration | (jump ahead to next step) |
In many cases the skeleton science program may not include an INSTRUMENT COMPONENT. Even if added automatically, by extracting information from your Phase I proposal, this component may only describe a default configuration (e.g. H-band imaging for NIRI or filter-less imaging for GMOS) and must be changed to your required configuration. Multiple filters, gratings, cameras etc defined in Phase I will not appear in the skeleton observations.
| Instrument Component: The instrument component defines the static configuration of the optical, mechanical and detector properties to be used for the observation. (These properties may be changed during the observation sequence by the corresponding instrument iterator, described in a later step). |
If your observation does not have an instrument component, add one now. An instrument component is added in a similar way as the note component described above. Select an observation and click on the Component button in the science program elements toolbar. Select the desired instrument from the menu displayed. As for the other components, an observation can contain only one facility instrument component. (Other instrument components that modify the beam but do not in themselves collect data, e.g. GPOL polarisation modulator or Altair adaptive optics module, can be added as well as a science instrument).
| In this example, a NIRI instrument component is to being added to the selected observation. Note that the Observing Conditions and Targets options in the menu are greyed out as the observation already contains these components. | 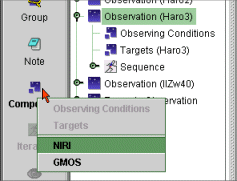 |
Select an instrument component in the science program to display its component editor. The details of the component editor vary from instrument to instrument. In general, the properties of the instrument are set by a combination of pull-down menus (e.g. for cameras, filters), numeric fields (e.g. for exposure time) and radio buttons (e.g. GMOS CCD readout mode).
If the instrument configuration in the observation does not correspond to your needs, change it now. Remember, if you make a major change from the configuration requested in Phase I you will need to follow the change request process described in step 4.
| There are separate web pages that describe the component editor for each instrument. (When available, these pages also describe the instrument iterator, wavefront-sensor visualisation and give tips and tricks on defining observations). See the instrument component page for links. You will likely also need to refer to information available in the main instrument pages for details of filter, grism and grating characteristics, background fluxes and optimum exposure times etc. |
| If you are using the same instrument configuration for more than one observation, you can copy and paste your modified instrument component into the other observation in the same way as for the target position (step 5). |
Any changes that affect the instrument field of view (e.g. different camera,
focal plane unit, slit or position angle) will be reflected in the position editor. To overlay the
instrument field of view (FOV), select the sci area button. The FOV is
drawn to scale in light blue and centered on the base telescope position. (Some
FOVs, e.g. GMOS IFUs, are small and you may need to zoom ![]() in the position editor to see them).
in the position editor to see them).
| Along one edge of the FOV there is a blue triangle; if you select drag mode and then click-and-drag this blue "handle" you can set the position angle interactively. |
| When using mid-infrared instruments that take data by chopping the secondary mirror (e.g. T-ReCS and Michelle), the location of the chop beams can be displayed as well as the main science beam FOV. Display of the (light blue, dashed) chop beams can be toggled on/off from the position editor View, Science Area Display menu. | 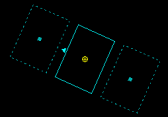 |
| Step 8 - Add a Telescope Sequence | (jump ahead to next step) |
Almost all observations require exposures to be taken at more than one telescope position. The OFFSET ITERATOR enables this capability.
| Offset Iterator: The offset iterator is used to construct a dither (or mosaic, offset etc) pattern of telescope motion. The offset pattern may be arbitrarily complex. |
The offset iterator is one of the sequence components (offset iterators, instrument iterators, repeat loops, Observe commands) that must all be contained within the sequence folder. To create a telescope sequence, select the sequence folder within an observation, click on the Iterator button and select Offset from the menu:
| Action | Example | ||
| (a) Select the sequence folder in an observation | 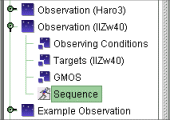 |
||
| (b) Click the Iterator button and select Offset
from the menu. (You may need to expand |
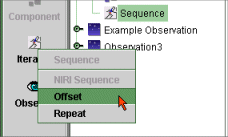 |
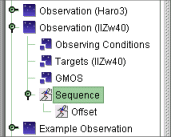 |
|
| (c) Select the Offset iterator to view its component editor. | 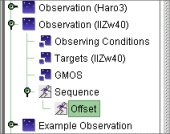 |
 |
|
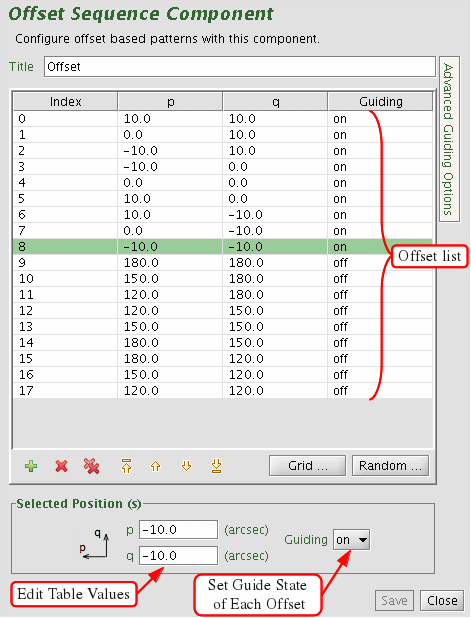
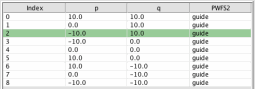
Offset positions are defined in an iteration table. Each row in the table is one step in the sequence; each step is defined by offsets in a [p,q] co-ordinate frame that rotates with the instrument. Thus an offset along a slit is always in the [q] direction, regardless of the actual position angle on the sky. (The desired position angle is specified in the instrument component or interactively in the position editor). We explore the wavefront sensor (WFS) features of the offset iterator in the next tutorial step.
The Grid and Random buttons of the Offset iterator component allows you to rapidly create a rectangular or random grid of offsets. You can change the step order using the arrow buttons below the iteration table. You can add individual steps manually, remove selected steps or clear the table (remove all steps) using the buttons.
| As an example, you can use the arrow buttons to re-order the offsets in the default rectangular grid, which is executed in a Z-shaped pattern, so that they are executed in a spiral. For more details about creating and manipulating offset sequences, see the Offset iterator page. |
The sequence can be displayed in the science program and position editors in several ways.
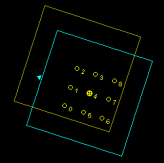
By default, when you click the Offset button in the position editor the offset positions for the selected observation are overlayed on the image as small yellow circles. Each circle is numbered with the step position. By default, with an offset step selected (i.e. highlighted) in the iteration table, the instrument field of view is drawn at that step. (This need not be the same as the base telescope position). If you select a different step in the offset sequence, the FOV moves correspondingly.
| In this example, step 2 has been selected in the offset iteration table (see below). The position editor (right) shows (a) the generic science FOV drawn in blue around the base position (earth symbol) and (b) the science FOV corresponding to (i.e. centred on) step 2 in yellow. | 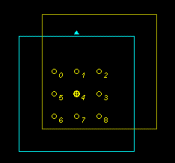 |
 |
| Since the [p,q] co-ordinate system rotates with the instrument, if you change the
position angle as in tutorial step 7, the whole offset pattern rotates.
|
 |
To show the instrument field of view at all offset positions simultaneously, on the position editor View menu, select Base Position Offset Display, Science Area, All Positions.
|
|
Note that if the base position does not coincide with an offset iterator step, no data will be taken at the base position. Another way of stating this is that the blue science area displays the science FOV but does not itself necessarily indicate where data will be collected. On the other hand, if there is no offset iterator in the sequence folder then data are taken at the base position only. |
| You can select and display (or re-order) multiple steps at once. To select several adjacent steps, click on the first one in the iteration table then shift+click on the last one; all steps in between will be selected (highlighted). To select non-contiguous steps ("disjoint sections"), select the first step and then ctrl+click on any others that you wish to select. The position editor (View menu, Base Position Offset Display, Science Area, Selected Position) overlay and the iteration table arrow buttons work in the same way as for individual steps. |
| With a step selected in the iteration table and that position overlaid in the position editor, it is possible to step through the offset sequence and display the science area and WFS probe positions in a (rudimentary) 'playback' mode. See Offset iterator page for more details. |
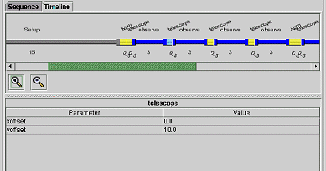
As well as the spatial view of the sequence, you can also display the observation timeline. Click on the Sequence folder in the science program editor and select the Timeline tab.
| The timeline is color-coded to show the various events (e.g.
acquisition overhead, offsets, instrument re-configuration, integration) with an estimated duration given underneath
the timeline in minutes. See more details about the timeline
and sequence list.
|
 |
|
|
Note that the overheads shown in the sequence timeline are not yet modelled accurately. For example, the offset and instrument re-configuration intervals default to a fixed value, irrespective of the size of the offset or complexity of the instrument change. Furthermore, detector readout overheads are not always included and can be significant, as in the case of GMOS calibrations. |
The Sequence tab shows as a table or list list the same series of events as in the timeline. The sequence list can be printed.
As with the telescope base position, you can move the individual offsets by editing the iteration table or interactively using the position editor. In the latter case, set the position editor into drag mode and click-and-drag the offset position symbol (the numbered yellow circle). The [p,q] co-ordinates in the iteration table will update to reflect the new location.
| The Observing Tool libraries contain a collections of commonly used telescope and instrument sequences. |
| Step 9 - Adding and changing Guide Stars for Wavefront Sensors | (jump ahead to next step) |
The Gemini telescopes are designed to be lightweight structures and are very sensitive even to light winds. Thus it is essential that all science data be collected with at least one wavefront sensor (WFS) locked onto a guide star to provide tip-tilt image stabilisation. In many cases, 'sky' frames (taken for background subtraction or flat fielding) and calibration stars should also be observed "closed loop" as the images may otherwise be smeared over many arcsec which makes extraction of the source-less background or photometry extremely difficult.
|
|
The requirement to operate with at least one WFS applies to every step in an offset sequence. |
The strategy of which WFS (e.g. facility peripheral sensor or on-instrument sensor) to use depends primarily on the instrument in use. For example the large vignetting pattern of the peripheral WFSs normally precludes their use for wide field imaging or spectroscopy (e.g. with GMOS) whereas the limited patrol field of the NIRI on-instrument WFS in f/6 mode requires that the peripheral WFS be used. Choice of WFS may also depend on the brightness of available guide stars and the desired precision of correction - as a rule, the closer the guide star is to the science target the better the correction, provided that the star is bright enough.
| More information about the choice of WFS can be found on the specific instrument component pages. Details of the facility peripheral WFSs are available. The on-instrument WFSs are described as part of the main instrument pages. |
Any guide stars defined in your Phase I proposal will automatically be included in your skeleton science program and are listed in the target component. Depending on the algorithm used to search for guide stars, they will be assigned to the peripheral (PWFS), on-instrument (OIWFS) or adaptive optics (AOWFS) wavefront sensor. Each guide star has a tag *WFS-n which can be displayed in the position editor. These tags are the means by which WFSs are assigned to individual steps in an offset sequence.
|
|
Due to the limited patrol field of each WFS it is important that you check the guide stars are valid at every position in the offset sequence (since offsetting the telescope may cause the star to move outside the patrol field or may introduce vignetting of the science field). Furthermore, the guide star catalogs do contain errors and invalid entries (e.g. the nuclei of galaxies or false detections near bright stars) which the automatic search algorithm cannot distinguish from real stars. Such problems are readily identified by overlaying the WFS locations in the position editor. |
| Currently PWFS1 should not be selected for either telescope. Please use PWFS2 if you need a peripheral wavefront sensor. |
The position editor is a convenient way to examine the WFS configuration and select guide stars. Click on the View WFS button to show (in green) all of the positions and tags in the guide star target list. Also click on any or all of the PWFS FOV, OIWFS FOV or AOWFS FOV View buttons to overlay the relevant wavefront sensor patrol field. In cases where the WFS mechanical structure can obstruct the light path (e.g. GMOS OIWFS, facility PWFS), the FOV buttons also display the vignetting pattern for that mechanism.
| More details about the PWFS vignetting overlay can be found on the position editor help page. Also included are instructions on configuring the PWFS and OIWFS FOV display e.g. to show the chop positions. |
When you create an offset sequence the first tag for each WFS (normally, *WFS-1) is assigned to every step in the sequence. Thus, if your target list contains one guide star tagged as PWFS2-1, the iteration table will contain this tag in every line. With the position editor open, stepping through the offset sequence (as in tutorial step 8) shows the WFS patrol field and vignetting at each position. (The motions and vignetting of the WFS mechanisms are modelled accurately e.g. the angles of the PWFS and GMOS OIWFS pick-off arms change to try and maintain acquisition of the guide star as the telescope offsets).
You may wish to change the guide star for every step (e.g. after overlaying the tag location on an image you discover that it is not a star).
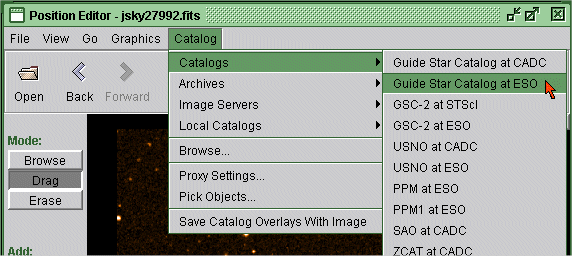
| To search for available guide stars, select the Guide Stars button in the position editor toolbar. Select the instrument in use (the instrument in the current observation should be chosen by default) and the type of guide star needed, and the catalog. Clicking "Ok" will begin the search and the returned stars will be plotted on the image. | 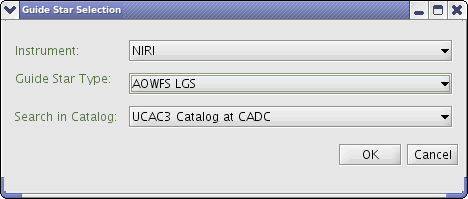 |
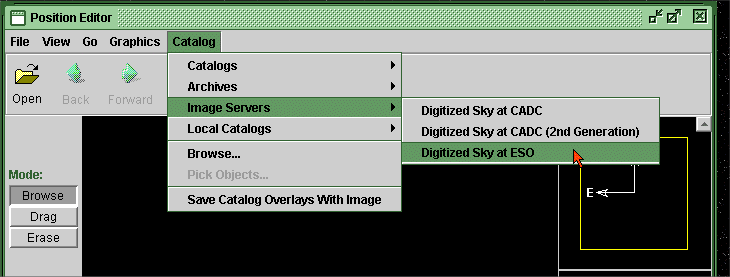
| You can also select one of the Catalog Servers from the list in the position editor Catalog menu. All entries will be retrieved from the server, from the ESO GSC-I in this example. The Catalogs button, or the Catalog browse menu, opens the catalog navigator that can be used to view the downloaded information, e.g. object brightness in available filters, and to manipulate further the overlaid catalog information. |
 |
Guide stars from a catalog are assigned WFS tags using the Add *WFS buttons in the position editor. Click on any position in the image to add that location [RA, dec] to the target list. If the chosen position is close to a catalogued object (use the View Catalog button to toggle on/off the overlay) then the (normally more accurate) co-ordinates taken directly the catalog, rather than from the image, are used in the target list (and other useful details such as the guide star name and brightness are added). As many WFS targets as desired can be added to the target list but it is best to have only one star of each tag type in order to avoid abiguity about which should be used.
There are two tags with special meaning: park and freeze. Park is used to set the WFS mechanism to a retracted position out of the beam i.e. that WFS is not used for that sequence step. Freeze disables the positioning mechanism leaving the WFS in the beam; unlike normal operation the WFS does not 'follow' the star when an offset sequence step is executed. This is useful when you wish to return to the same guide star with the highest possible precision.
Unwanted tags can be deleted either by removing them from the list in the telescope target component or in the position editor by setting erase mode and clicking on the tag location (i.e. the green square). It is not necessary to delete unused tags. If a WFS tag is 'in use' and assigned to offset sequence steps then the WFS is set to park for those steps.
| Step 10 - Add an Instrument Sequence | (jump ahead to next step) |
You have defined the basic instrument configuration using the instrument component in tutorial step 7. The configuration can be modified (e.g. change the filter or grating wavelength) as part of a sequence using the relevant INSTRUMENT ITERATOR.
| Instrument Iterator: The instrument iterator is used to construct a sequence of instrument configurations e.g. to cycle through filters as part of an observation. It may be used in conjunction with the telescope offset iterator to create complex sequences. |
Like the telescope offset iterator from tutorial step 8, the instrument iterator is one of the sequence components (offset iterators, instrument iterators, repeat loops, Observe commands) that must all be contained within the sequence folder. To create an instrument sequence, select the sequence folder within an observation, click on the Iterator button and select the relevant iterator from the menu.
|
|
The corresponding instrument component must be present in observation before its instrument iterator can be added. If the component is deleted, so is the iterator. The individual instrument iterators are described in more detail on the OT instrument pages. |
| The instrument iterator modifies the instrument component, thus there is no need to specify a parameter in the iterator if it does not change during the sequence. |
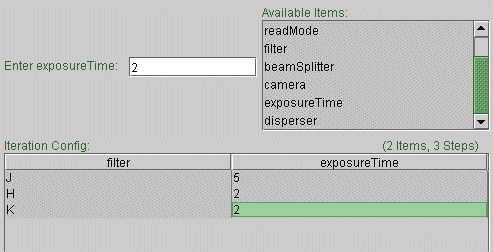
The instrument sequence obeys the same step metaphor as did the telescope offset sequence. In the case of instruments, the columns in the iteration table are the instrument mechanisms - almost any element that is definable in the instrument component can be iterated over. In the following simple example, a sequence is constructed to cycle through the J, H and K filters with NIRI using an appropriate exposure time for each:
| Action | Example | ||
| (a) Select the sequence folder in an observation | 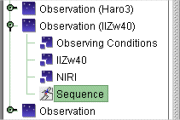 |
||
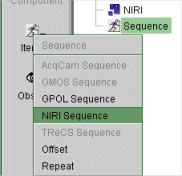
| (b) Click the Iterator button and select NIRI
Sequence
from the menu. (You may need to expand |
 |
 |
|
| (c) Select the NIRI Sequence iterator to begin editing |
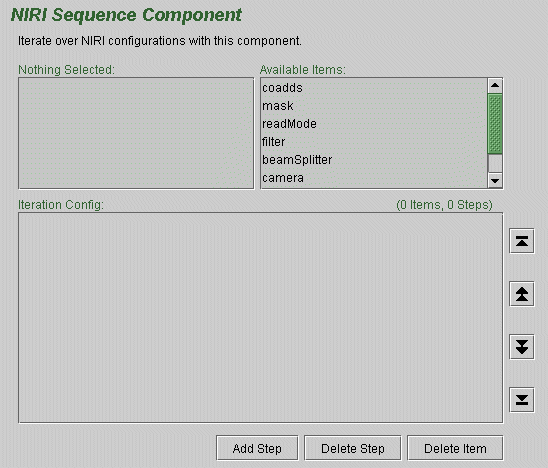 |
||
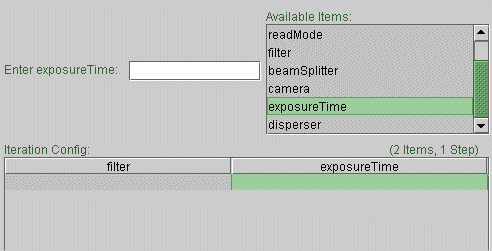
| (d) Select Filter and exposureTime from the list of available items to add these to the iteration table |
 |
||
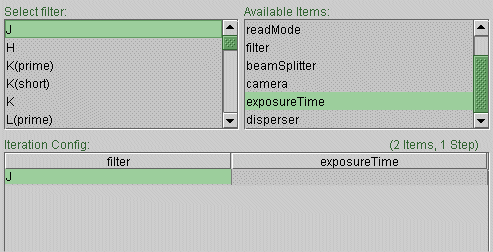
| (e) Select the first (blank) cell in the table and select J filter |
 |
||
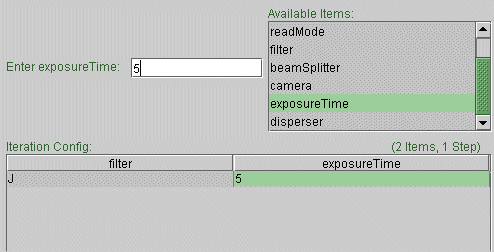
| (f) Select the adjacent cell, then click in the data entry field and type the desired exposure time |
 |
||
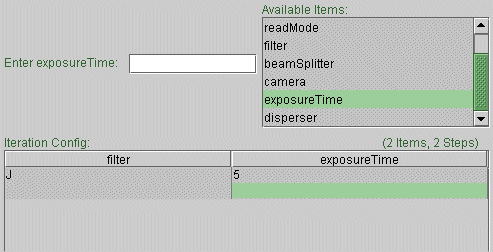
| (g) Click Add Step to create a new row in the table |
 |
||
| (h) Repeat steps (d) to (g) for filters H and K (note that it was not necessary to enter the exposure time for the K step as it is the same as for H, but we have done so to improve readability) |
 |
||
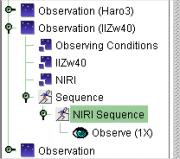
| (i) Select the NIRI Sequence, then click the Observe button and select Observe from the menu. (The Observe iterator takes data; we'll learn a little more about it in the next tutorial step). | 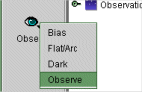 |
 |
|
You can think of the hierarchical sequence as a programming language. In the example above, one Observe occurs for each step in the NIRI sequence (think nested do or for loops). Select the Sequence folder and examine the timeline (you may need to zoom in and scroll to the extreme right, this example is dominated by overheads!) and sequence list to inspect the order of configuration commands.
|
|
The order and hierarchy of the sequence elements is important. In the example above, if the NIRI Sequence and Observe elements had been arranged as shown right then only one Observe would occur, at the end of the sequence (i.e. the instrument would cycle through J, H and K filters, without taking data, and then take data with the configuration from the static NIRI component). | 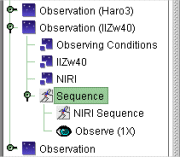 |
| The order and hierarchy of elements in a sequence can be changed by dragging-and-dropping. In fact this applies to any components in the science program. For example, to correct the poorly constructed sequence above, click on the Observe element (either the 'eye' icon or the adjacent "Observe (1x)" text and drag it up and right to a position under the NIRI sequence element. You cannot drag-and-drop a component to create an invalid observation (e.g. one with two Observing Condition components). |
Instrument and telescope offset sequences can be combined in the same observation (e.g. to execute a dither pattern in between grating scans or filter changes). In fact you can create arbitrarily complex sequences with as many instrument and offset iterators as you wish although judicious use of one repeat, one instrument and one offset iterator is normally enough for most observations.
| The Observing Tool libraries contain collections of commonly used telescope and instrument sequences. |
| Step 11 - Add Observe Commands to Take Data and Calibrations | (jump ahead to next step) |
The most commonly used Observe command is (imaginatively) named Observe, and was introduced in the previous tutorial step. The Observe command takes data with the current instrument configuration at the current telescope position. The only parameter is the number of Observes issued, each of which creates one dataset (i.e. one FITS file).
|
|
Multiple Observe commands should not be confused with "coadds". Some instruments allow multiple data frames to be taken and accumulated internally to the detector controller. Depending on the instrument, the coadds may be summed or kept as separate frames but all end up in a single (multi-extension) FITS file. |
As the Observe command(s) are the only ones that take actually data, they must therefore be at the 'root(s)' of any sequence 'tree'. One convenient way to confirm that the Observe commands do what you expect is to look at the sequence list and, especially, the timeline.
There are three special Observe commands that take calibration data. Their use depends on the instrument.
| Most observers do not need to include these calibrations in their science programs as suitable measurements are taken as part of the baseline calibration program. For details of the baseline calibration plan for each instrument, see the calibration section of the Performance and Use page for each instrument (e.g. via the main instrument pages). |
The calibration Observe commands are:
| For information about the GCAL lamps and filters see the instrument pages and GCAL pages. |
| Step 12 - Add Standard Stars, Other New Observations and Groups | (jump ahead to next step) |
The skeleton science program is created with the observations specified in the Phase I proposal. In some cases you may wish to add new observations that were not completely defined in Phase I e.g. the time requested was for a single nominal target from a target list, to subdivide the approved allocation (remember, an observation is the minimum schedulable block) or to add calibration (standard) stars.
| A minimum set of standard stars is taken as part of Baseline calibration but the observations are usually defined in the science program. For details of the baseline calibration plan for each instrument, see the calibration section of the Performance and Use page for each instrument (e.g. via the main instrument pages). |
|
|
Remember, if you intend to make a significant change to your science targets you must follow the change request process. It is a good idea to check first with your National Office or Contact Scientist support staff member. |
| New observations are added by clicking on the Observation button. You can do this from any level in the science program (i.e. you do not need to have first selected the top-most level in the hierarchy). New observations are added at the bottom of the science program with default Observing Conditions ("Any") and Target (RA = 0 hr, dec = 0 deg) components and an empty Sequence folder. If appropriate, you can copy target, instrument and other components and iterators from other observations to speed definition of the new one. | 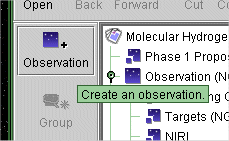 |
As discussed in tutorial step 3, the ordering of observations in the science program does not convey any prioritisation regarding preferred order of execution.
|
|
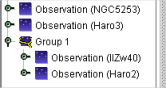
You can group together observations that must be executed together e.g. a special calibration and a science target in a scheduling group. However, be careful when doing this as a scheduling group becomes the smallest schedulable element and you may reduce its likelihood of execution if the group occupies a long period of time. Unlike individual observations, the ordering of observations in the group does impose a specific execution sequence. |
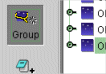
An observation is placed into a group by selecting the observation and clicking on the Group button. This will reveal a menu with options Scheduling Group and Organizational Folder. Observations within a scheduling group are executed together while observations within folders are executed independently. Select the appropriate type. Other observations can be added to the group/folder by dragging-and-dropping them onto the group or folder in the science program. This procedure is illustrated below. You cannot delete a group directly. Instead, you can delete or move (by dragging-and-dropping) observations out of the group and the group folder disappears when it no longer contains any observations.
| Action | Example | ||
| (a) Select the observation that you wish to include in a group | 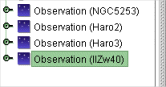 |
||
| (b) Click the group button. (You may need to expand |
 |
 |
|
| (c) Select another observation (in this case, Haro 2) and drag-and-drop it into the group folder | 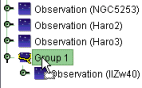 |
 |
|
Select the group folder to rename the group and to show the total time for all observations in the group (i.e. the sum of all the sequence timelines). Note that as with individual observations the overheads are not modelled accurately.
If you would like to change a group to a folder, or vice-versa, then click on the group component and change the Group Type from Scheduling Group to Organizational Folder.| Step 13 - Checking Your Science Program | (jump ahead to next step) |
By the time you are finished with the Phase II there should be no error messages from the Phase II checker and any warnings should be acceptable.
|
|
The responsibility for ensuring that the science program describes the intended observations rests with the PI. |
There are several checklists available for completed
science programs:
|
If you have questions about the Observing Tool or construction of your science program, please use the web-based Help Desk. This routes queries directly to the appropriate support staff member (initially in the National Gemini Offices, and escalated to Gemini Observatory staff in more difficult cases) and allows us to monitor problem areas for improvement of the software and documentation.
| There is streamlined interface to the Help Desk which is keyed to your Gemini Program ID number; access details are provided with distribution of the skeleton science programs. The search engine (same link) is also a good way of finding relevant information. |
| Step 14 - Submit Your Completed Science Program to Gemini |
|
|
 |
To upload your science program to the Gemini Observing Database, store the science program using the file...store menu available from the science program editor. The observations are merged automatically with the existing contents of the Observing Database; only the observation version that is furthest along its life cycle is retained (e.g. so that executed MOS pre-imaging observations are not overwritten when the MOS spectroscopy observations are added). Setting the status flags and storing the science program causes the Observing Database automatically to notify the relevant National Office and Gemini support staff that one or more observations are awaiting review.
Once you have stored an observation with status For review, do not modify the observation until it has been set back to Phase 2 by the NGO or Gemini contact. Making changes can interfere with the review process and your changes may get erased when you store. Always fetch your program before making changes and export the program to an XML file before storing to prevent the loss of changes.
|
|
Note that PIs can only change the observation status between Phase 2 and For review. (The reverse change is available so that a PI can change their mind about the status). |
| See more information about the Gemini observing database, subsequent checking by National Office and Gemini support staff and the status flags. |
![]()
![]()
Last update June 11, 2008; Bryan Miller